MapInfo Exponare Enquiry: Integration Guidelines
myData & MapInfo Exponare Enquiry – Integration Overview
System Integration is two-way:
- Configurations are entered to allow myData to invoke Exponare Enquiry
- Links are added to Exponare Enquiry to invoke myData
1. Create a Workspace for myData
If you haven’t done so already, create a Workspace for myData using MapInfo Workspace Manager.
This Workspace should include any asset layers you want to link to myData, as well as any reference layers you want to display in addition to the asset layers.
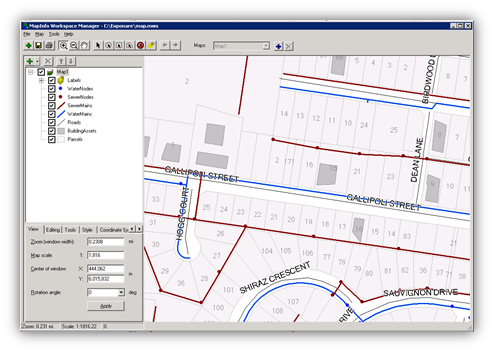
Create a Workspace for myData using MapInfo Workspace Manager
2. Create a Work Context for myData
In Exponare Enquiry, open the Exponare Configuration Manager and create a new Work Context for the Workspace you just created (if you haven’t done so already).
Give this Work Context an appropriate name and reference it to the Workspace you created in the previous step.
Highlight the new Work Context and hit the Update Layer Settings button to load the Workspace layers into Exponare.
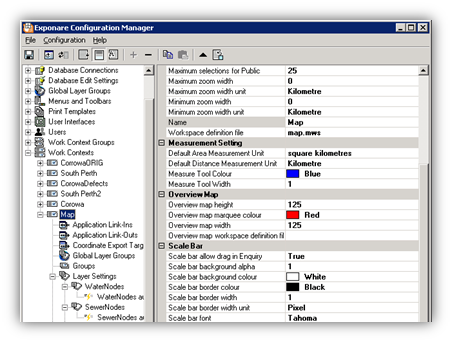
Create a Work Context for myData and Update Layer Settings
Delete all of the auto-generated Data Binds as these don’t really include any information required for integration.
Select each Data Bind from the tree on the left and hit the ‘–‘ button to remove it from the Work Context.
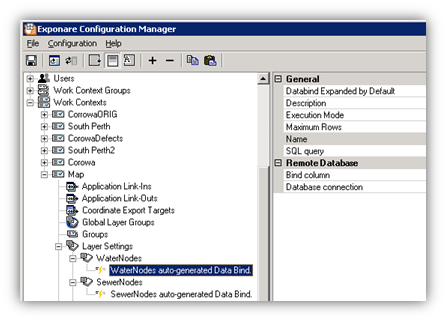
Delete the auto-generated Data Binds by highlighting them and hitting the ‘–‘ button
3. Exponare Enquiry Users
Exponare Enquiry authentication is optional for myData integration.
If you do have username/password combinations set up for all Enquiry users (that are not authenticated by Windows), you must create a separate user for myData.
This will be the account that all myData users log in as when they launch Enquiry from myData.
4. Achieving a link from myData to Exponare Enquiry
To allow myData to select an asset in Exponare Enquiry, you will need to add a new Application Link-In for each layer you want to launch from myData.
Open the Exponare Configuration Manager and complete the following:
- Go to the Application Link-In section for your Work Context and add a new one to the view.
- Choose “Native” as the Database connection
- Set the Link id in external application to a name that corresponds to the myData Asset Category you are linking to (e.g. “SealedRoads” or “Buildings”). Note that this string needs to match with configurations entered in myData in a later step.
- Enter the Link-in bind column. This should be the field in the MapInfo table that matches the myData Asset ID
- Enter the Link-in bind table. This should be the layer name in the MapInfo workspace
- Enter a Name for your Application Link-In (e.g. “myData Roads”).
- Enter a SQL query as follows:
- select Roads.mi_key from Roads (where Roads is the layer name in the MapInfo workspace)
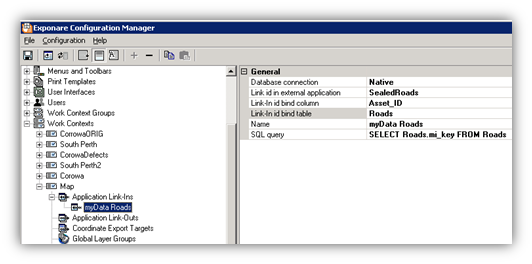
Enter the Application Link-In details for each layer that needs to be linked to myData
5. Achieving a link from Exponare Enquiry to myData
To allow Exponare Public to link back to myData, you will need to ensure that a Data Bind exists for each layer you want to link.
This Data Bind must contain the ID field. If a Data Bind already exists with this information, you may use it.
Otherwise, you can create a new one by following the instructions below:
- Under Layer Settings, highlight the layer you want to add a new Data Bind to and hit the + button.
- Add a Description (e.g. “Asset ID used for myData”)
- Enter a Name (e.g. “MyData Road ID” or “MyData Building ID”)
- Enter the following SQL query:
- Select mi_key, ID from Roads_Selection (where ID is the field in the MapInfo table which matches the Asset ID field in myData and Roads is the layer name in the MapInfo workspace).
- Set the Database connection to “Native”

Create a Data Bind containing the ID field for each layer you want to link to myData
Once Data Binds containing the ID field exists for each of the layers you want to link to myData, you will need to create an Application Link-Out for each layer.
- Go to the Application Link-Out section in the tree and add a new one to the view.
- Under Application Executable, navigate to the MyData.EnquiryBridge.exe file in the myData install directory. This will generally be as follows: C:\Program Files\Assetic myData\MyData.EnquiryBridge.exe
- Next to Args, enter “ “[LinkFileLoc]” “
- Choose “Native” as the Database connection
- Add a Description e.g. “Enquiry to myData link”
- Set the Link id in external application to the database name of the myData Asset Category you are linking to (e.g. “SealedRoads” or “Buildings”)
- Enter a Name for your Application Link-In (e.g. “myData Roads”). This is the name that will appear in the Link menu in Exponare Enquiry
- Leave the SQL query section blank
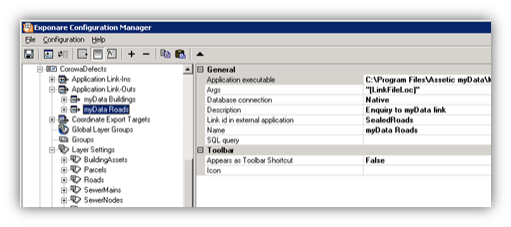
Create an Application Link-Out for each layer you want to link to myData
For each Application Link-Out, you will need to attach a Data Bind containing the ID field of the layer you are linking (i.e. the Data Bind created in the previous step).
To do this, highlight the Application Link-Out you just created, hit the + button to attach a Data Bind and enter the following information:
- Next to Column Name, enter the name of the field in the MapInfo table that corresponds to the myData Asset ID
- Under Data Bind, select the Data Bind containing the ID information from the drop-down menu
- Add a Name to your Application Link-Out Data Bind (e.g. “Roads Data Bind” or “Buildings Data Bind”)
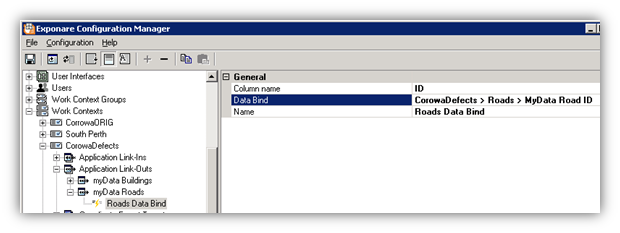 Attach a Data Bind to each Application Link-Out
Once your Link-Outs are complete, you are able to launch myData from a selection in Exponare Enquiry by selecting the appropriate Link-Out for your layer from the Link menu.
6. Configuration in myData
To unlock the Exponare Enquiry plugin for myData, Assetic must activate this feature in your license file.
You must ensure that your license allows access to the plugin before proceeding.
To check, open myData and go to Tools>Integration and GIS, licensed plugins will appear in the Supported Products list.
Open myData and go to Tools > Integration and GIS to open the Configuration Window.
Highlight the Exponare Enquiry entry under Supported Product and hit the Add button to add a new Product Instance to myData.
Give your Product Instance a name (e.g. Enquiry Launch) before hitting the Edit button.
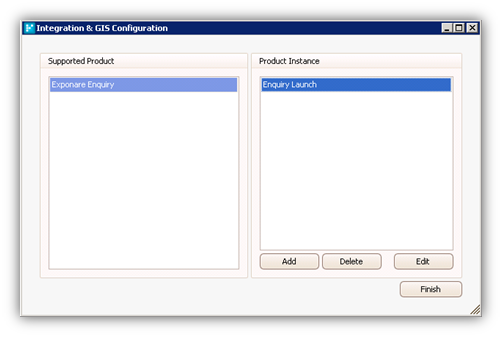
Open the GIS Configuration dialogue and add a new Product Instance
You will be taken to the Exponare Enquiry Configurations dialogue where you can add the following information.
Under the Program Settings tab:
- Program Location: hit the … button and navigate to the location of your Exponare Enquiry executable. This is generally found in C:\Program Files\MapInfo\Exponare\Enquiry\ExponareEnquiry.exe
- Context Name: the name of the Work Context you created for myData
- Username: the username you created for your myData user (if applicable)
- Password: the password you created for your myData user (if applicable)
NOTE: If your organization is running PCs on both Windows 32bit and 64bit, you may have to configure separate Product Instances to cater for the different file paths to the Exponare Enquiry executable. 64bit PCs will generally have Exponare Enquiry installed in the "C:\Program Files x(86)\" directory, while 32bit PCs will use "C:\Program Files\". This will create two Enquiry Launch buttons in the toolbar, and users will be able to launch Enquiry by clicking on the button specific to their PC.
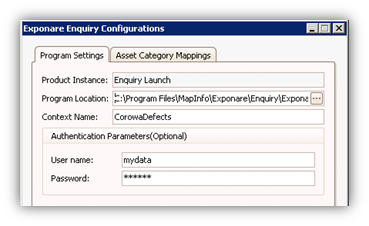
Exponare Enquiry Configurations – the Program Settings tab
Under the Asset Category Mappings tab, enter the Link id in external application string you entered for each of your Application Link-Ins.
You will need to do this for each Asset Category you want to link to a layer in Exponare Enquiry.
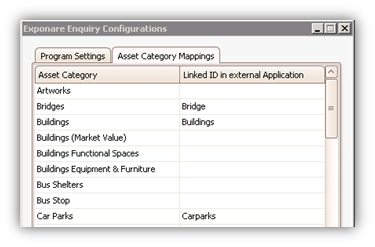
Exponare Enquiry Configurations – the Asset Category Mappings tab
Hit Save to save your configurations.
When you select an asset in myData, you will now be able to launch to this asset in Exponare Enquiry but clicking on the Enquiry icon on the left-hand side of the myData toolbar.
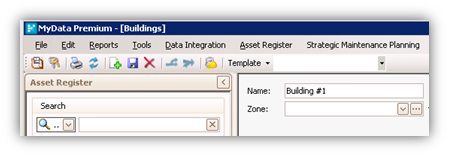
Exponare Enquiry launch button in the myData toolbar
